
I thought I’d better write about all the stuff they don’t tell you. Though I remained hopeful, I did not meet the mysterious, scientific conditions for indoor plant survival.
Let me back up a bit. The first part of the story goes like this: Everything is wonderful. I succeeded. My indoor plant stigma disappeared as charming sproutlettes emerged from the little grow plugs in my cat-proof seed-starting system.
The plot thickens when two of my yogi tomato sprouts shriveled in a grandiose and exhausted forward bend, and all my old brown thumb failure stigmas flooded the scene. I panicked, then took action.
Salvaging my seedlings
Step One: Get them out of the aquarium. Once sprouted, my seedlings didn’t need that intense of a moisture-retainer and all it was doing was encouraging mold (my two tomato seedlings’ murderer.) I discovered that the starter plug thingies (though handy at the time) are a royal pain in my ass, since I had to up-pot/add soil to all my seedlings. Next year I’ll just start with a good potting mix and not think twice about it. This is where that supply of yellowing plastic cups in the back of your cabinet come in handy.Step Two: Replace compact fluorescent bulbs with grow light bulbs that will up the temperature ante. (Remember that my apartment faces north and is sandwiched between buildings, translate: the sun does all its magic with little regard for my chlorophyll needs.)
So, yeah, you can go out and buy a $200 grow light system (for something you may or may not do again) or you can get creative and make your own. I opted for the latter since I’m not sure if I’ll scrap indoor seed-starting in the future. I got two 50W/120V grow spectrum bulbs at Lowe’s, each for about $5.
DIY Grow-lights
I can’t believe I’m showing you our closet/mudroom/shed/where-everything-we-don’t-know-what-to-do-with-goes-room, ah well. This is reality, after all.
Note: This exact set-up is obviously meant to be tweaked to cater to your own situation, to get you on the problem-solving track. Please do follow directions for the type of grow bulb you purchase on which types of sockets to use and specific wattage instructions. Be safe, yo! Things you’ll need, plus a heavy-duty clamp (clothespin on steroids, not pictured)Here’s where your handy, dandy aquarium lid remains handy.
- Feed two standard, drop light bulb cords through the lid’s doorway so their sockets dangle on the underside of the lid.

- Cut two 10”-12” pieces of a thin, bendable wire and wrap them around the plastic part of each of the sockets, between the screw cap thing and the base


- Now feed each end of wire through some part of the aquarium lid’s frame and twist tie it to secure the bulb in two places. You can snip your wire if it’s too long, but I liked keeping the length on mine since it gave me added flexibility in positioning my bulbs once hanging.

- Now feed a piece of twine through each of the four loops on the top side of the aquarium lid.

- Affix lid to a secure shelf via your twine ‘handle’ with the clamp.

- Position light bulbs (while off! they get very hot), don’t panic if you need to move one of the wire loops in order for the lid not to tilt crazily. Be patient. You’re saving $200, remember.
- Plug in the bulbs and make sure things that may fall into the bulb’s projection area or the plants themselves are not closer than 1-foot from the bulbs. They put off a lot of heat.
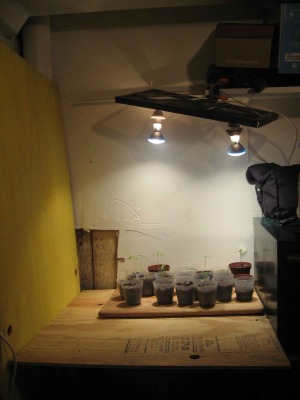 Huzzah! Happy grow-lit seedling situation.
 - Check the aquarium lid frame and the wires for excessive heat after a half-hour to see if you need to make safety adjustments to the set-up.
And, reconnecting to the top of this post (like a page-long sentence in a Victorian novel) the third step in salvaging my seedlings is: harden them off asap. The sooner they get outdoors, the less you’ll have to worry about. They need the phase-out from artificial, indoor light to the big Kahuna UV action from the sun. Set your seedlings outside for an hour or two in morning or late afternoon sun. They like a little wind, too.
So does she.
The story’s not over yet, but I’ve managed to thwart failure for now. How are your seedlings? Have you already said ‘bugger it’ and bought starts for the plants you can’t direct seed? Feel free to teach me something or make me feel better about myself.