
Grape jelly is magical. Jelly itself is one of those miracles of science that bolsters kitchen empowerment to new heights. And, as it turns out, I have enough to say about jelly to make this blog post feel like the Hip Girl’s Guide to Grape Jelly.
I’m not going to lie, though. Jelly is sort of the primadonna of the canning scene. It’s the only kind of sweet spread for which I actually pull out the thermometer. It’s totally worth it though.
The scoop on jelly
There are a few quirks to work out, but jelly making is really not as fussy as people make it out to be. This was my first commercial-pectin-less attempt at jelly. (Which leads me to the understanding that apples are truly the magical ones in this equation.)
I’m not going to post the basic recipe here since I followed Linda’s specs and direction almost to a ‘T’; I don’t have room to reproduce those two pages. Buy or borrow her book.
I will mention places where I needed help or how things ended up a bit different than she instructed. I’ll make a future post on shaking this recipe up by adding honey and lavender, reducing sugar and still arriving at jelly.
Your jelly success will depend on a number of variables:
1. Preserving pan
Use the heaviest-bottomed and widest-based pan you’ve got. You want the jelly to have even access to the heat so a wider cook space spreads the juice out and allows it to cook more evenly. Don’t use non-stick. I used my self-gifted, birthday preserving pot (which I think needs a post of its own one of these days).
2. Your fruit
Your grapes should be firm. Eat the mushier, broken open ones as you wash and prepare them. Your apple should be slightly underripe (or, at least, super firm and crisp). A couple unripe, never-gonna-ripen crabapples would work fine here, too.
3. Sugar
I use organic sugar because that’s what I want to eat. I don’t care about the guarantee of making perfect-looking/setting foods all the time. I have a lot of success with this product from Wholesome Sweeteners.
4. Your thermometer
You could also swap out a decent digital thermometer for a good bit of patience (needed for interpreting doneness from the way cooked syrup drips off a frozen spoon). More on the spoon test later.
Equipment and inputs
I started with about 3.5 lbs of concord grapes, an impulse buy on an afternoon detour through the farmers’ market, which yielded about 3.5 cups of juice the next day. I ended up with two sealed pints of jelly, spread out into two half-pints and four quarter-pints, and about a quarter-pint for the fridge. I like having fridge leftovers because it’ll show you what your jelly is up to inside the sealed jars (without you actually having to pop one open to see).
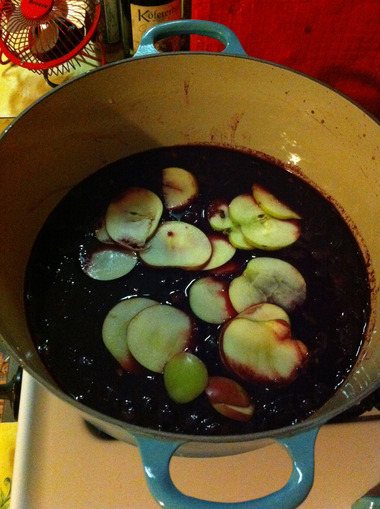 Added pectin: mashed grapes simmering with a finely-sliced apple After simmering the mashed fruit and apple slices, I set my metal strainer over a glass bowl and left it on the counter for a couple hours to drip. Then I moved the whole contraption into the fridge for the night since it seemed like quite a bit more juice lurked in the pulp.
On day two I used a (clean, damp) muslin produce bag to strain the tartrate crystals out of the juice before cooking it. (This crystal formation is why grape jelly is a two-day project. You don’t want these little cream of tartar crystals chunking up your jelly.) It worked beautifully and turned my produce bag into a hippie.
Reaching the gel stage
I hate measuring temperatures. Marisa swears by her digital thermometer with a submerge-able wire (which pretty much eliminates half the troubles I have with thermometers). I have the poke-stick kind, one that my mom used to use to inspect food in restaurants (it’s pretty fancy). But, even with the most high-tech equipment, you’re still not guaranteed success. It’s hard to get an accurate reading from an inch-deep liquid no matter how much money your thermometer costs.
1. I wear my fancy gloves whenever I encounter a temperature-reading-required recipe. Even if you don’t accidentally touch the boiling liquid, the steam is sure to get you while you’re sticking your hand into the bubbling pot to get a reading. Lesson already learned here.
2. Stirring will help you maintain consistent heating, but don’t stir so much that the juice won’t have a chance to boil long enough at temperature. Stirring is a tricky part of jellying. The better preserving pan you have, the less likely the sugar will scorch the bottom, and the less you’ll need to stir it.
3. Different areas of your pan will simultaneously be at different temperatures, which is thoroughly frustrating and confusing. You want the magic number 220 for the whole pan. You’ll get all sorts of numbers as you move the poke-stick into different areas of the pot. I measured temperatures in five or so areas of the pan and I got temps between 214-221 in one sweep. It’s unavoidable that there will be a range of temps, even in a Le Creuset enameled cast iron pan. Glove on, I kept at it.
Once my juice reached a boil, my batch took about 12 additional minutes for all areas to reach 220. I pulled it off the heat and grabbed my frozen spoons to make sure it was going to gel.
Spoons
Linda has an excellent section on all the different ways to check for gelling (in the book I mentioned previously).
Unlike the case with jams (larger, spread out, dark bubbles), you don’t really see much physical change in the syrup at the time it’s gelled, so if you’re not sure your thermometer (and arm/fingers/hand) is up to the task of precision, then a frozen spoon can help you out. Pop 4 or 5 regular spoons in the freezer on a plate before you start your jelly.
When you think it’s finished, pull the pot completely from the heat, grab your plate of spoons and dip one of the spoons in to scoop up a little of the jelly. Place plate back in freezer for a few minutes. When you tip the spoon over, you’ll see what your jelly will be like at room-temp and in the fridge after opening. If it’s super runny, just cook the jelly a bit longer and retest by repeating these steps.
What jelly?
Waiting on the upwards of four days (maybe even a week) to see if your jelly sets is perhaps the craziest part of all this. Not knowing if you have syrup or jelly after two days of work might do you in. Whatever you do, don’t shake, invert or even touch the jars once you’ve processed them in the boiling waterbath. Leave them alone and forget about the jelly for at least 3 days, the processed jars could take up to a week. Checking before then will make you depressed and could even break up the gelled bonds. Checking the fridge jar is your best bet because it will set faster (since it wasn’t processed in boiling water).
If you’re open to either result (grape syrup is arguably a more versatile ingredient to have on hand) then jelly making won’t be nearly as stressful.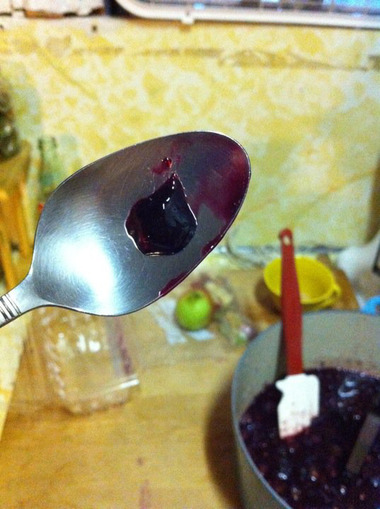
When the gel of jelly happens though, you forget all about the work you’ve done up to this point. If it doesn’t happen, use it as syrup added to baked goods, cocktails or re-cook it (and add another apple if you’d like) and try again.